Connect Protect Ads to your website and ad accounts to shield your Google Ads and Microsoft (Bing) Ads budget from click fraud — live in minutes, no developer required.
Works with Google Ads & Microsoft (Bing) Ads — and any website that runs JavaScript
< 1 KB
Lightweight tracking script — zero impact on page speed
2
Ad platforms protected — Google & Bing
12
Protection layers, pre-configured and ready
Real-time
Fraud detection with automatic IP blocking
Protect Ads integrates with your website and Google Ads to detect and block fraudulent clicks. Follow the flow below to get started.
Create your account and register the domain(s) where your Google Ads land. This links your traffic to your Protect Ads dashboard.
Add the Protect Ads script to your website (via Google Tag Manager, WordPress, or directly in your template). The code runs on your landing pages and helps us identify and block invalid traffic.
Link your Google Ads account via our secure OAuth flow. We use this to apply IP exclusions and block fraudulent clicks at the campaign level.
Use the dashboard to view blocked clicks, adjust rules if needed, and keep your ad spend focused on real users.
Protect Ads monitors clicks on your ads and landing pages, identifies bot and fraudulent behavior, and automatically adds offending IPs to your Google Ads account as exclusions. This reduces wasted spend and keeps your metrics accurate.
After setup, log in to your Protect Ads dashboard to see fraud metrics, blocked IPs, and campaign impact. You can fine-tune blocking rules in Domain Settings and review performance over time. Support is available if you need help with configuration.
This guide is for single website owners
The steps below walk you through setting up Protect Ads for a single website or online store. If you manage multiple domains or client accounts, scroll down to the Agency Setup section for the full multi-domain guide.
Follow these steps inside the Protect Ads dashboard to get up and running in minutes.
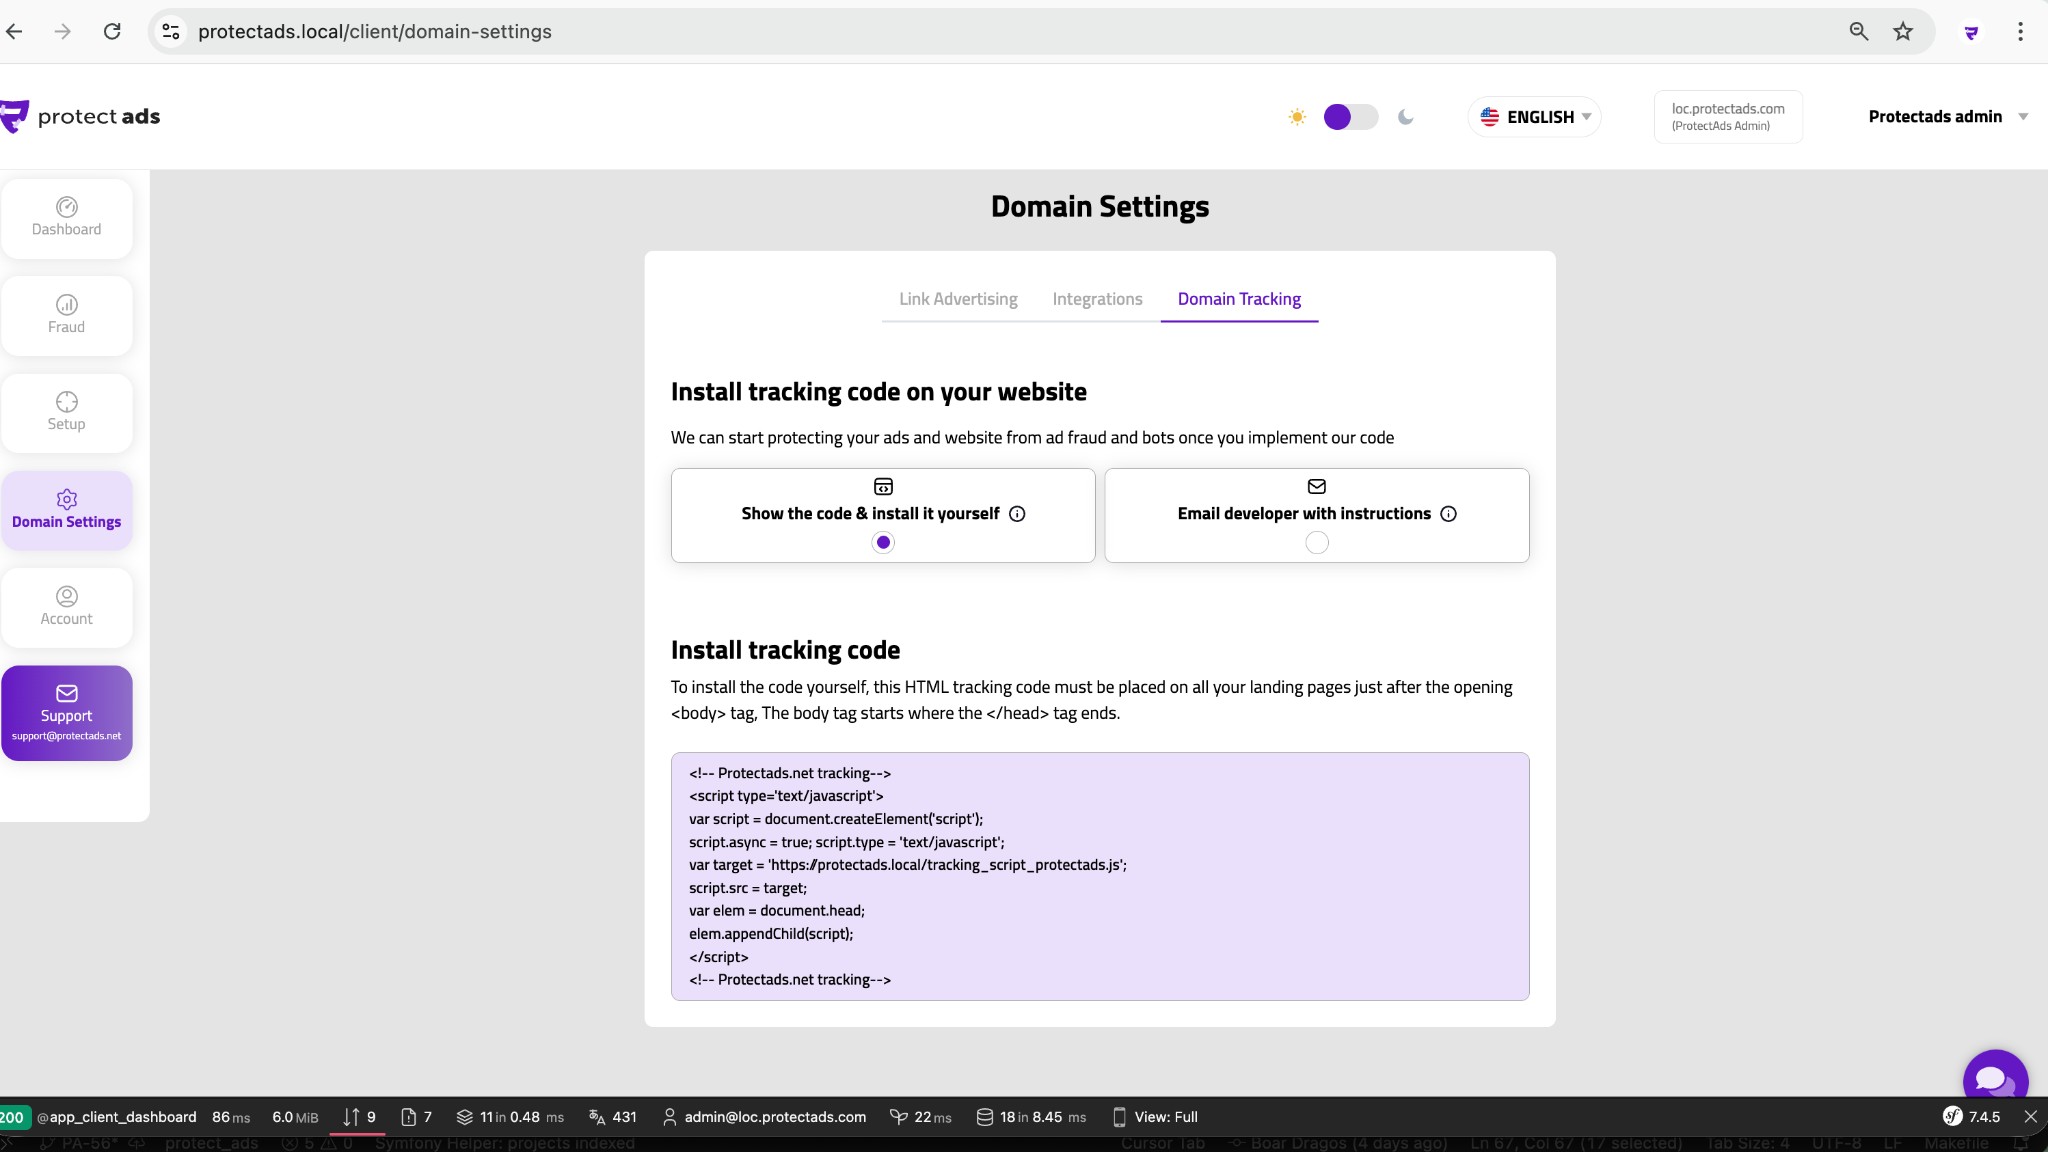
Go to Domain Settings > Domain Tracking and copy the tracking snippet. This is the code you'll add to your website.
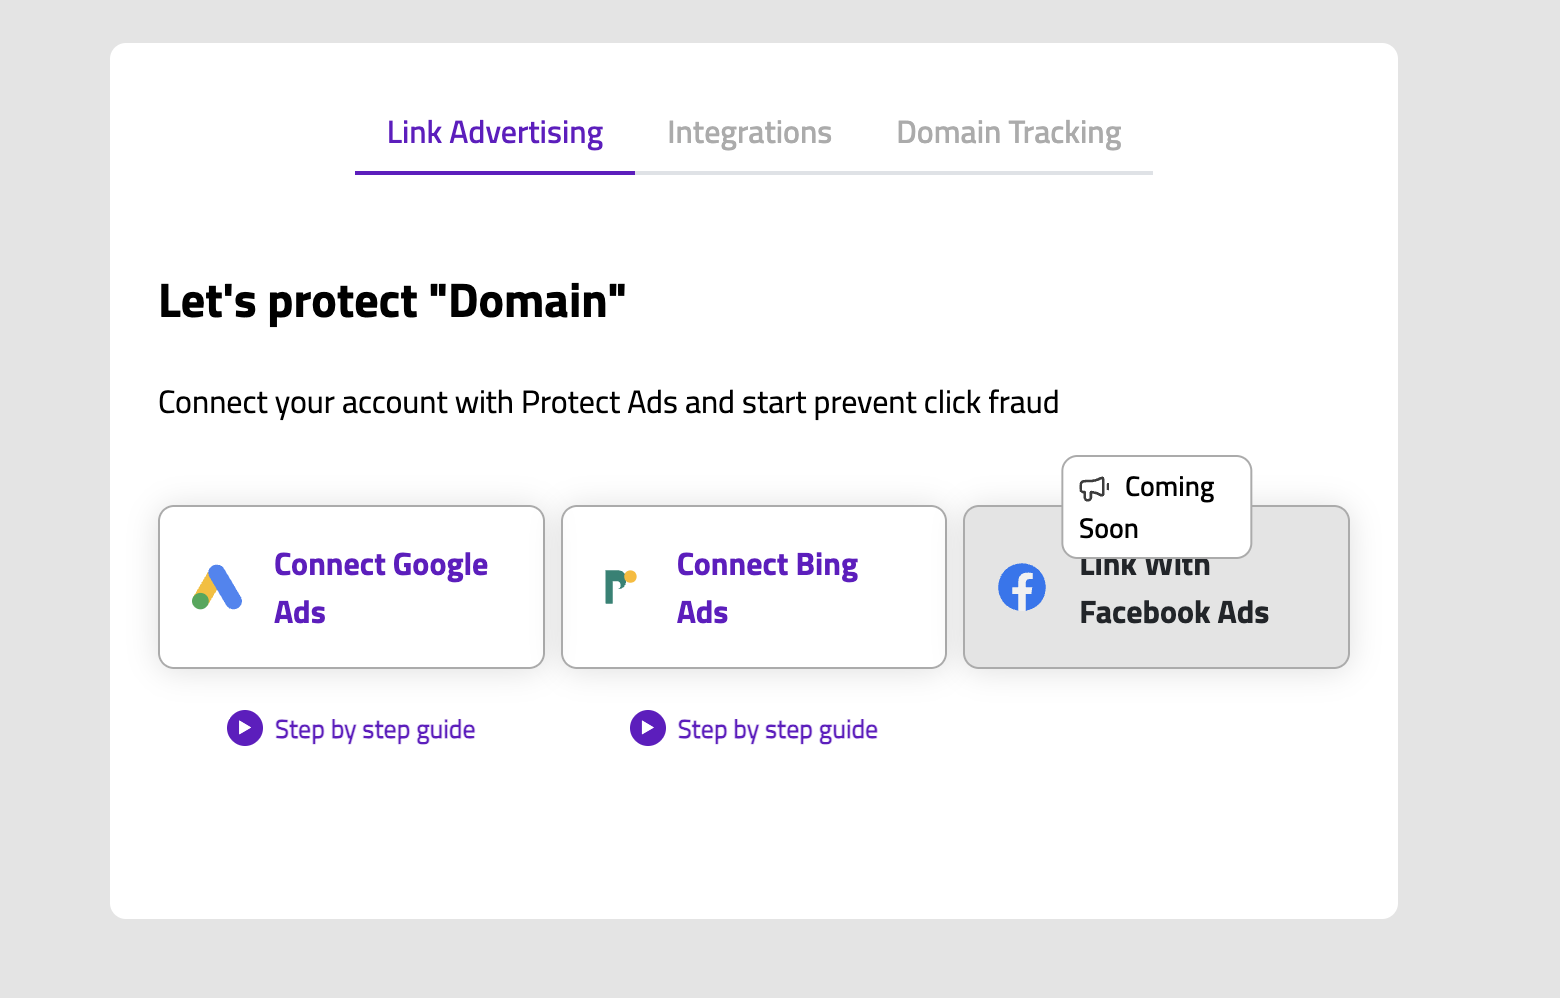
In Domain Settings > Link Advertising, connect your Google Ads and Bing Ads accounts. We use this connection to apply IP exclusions automatically.
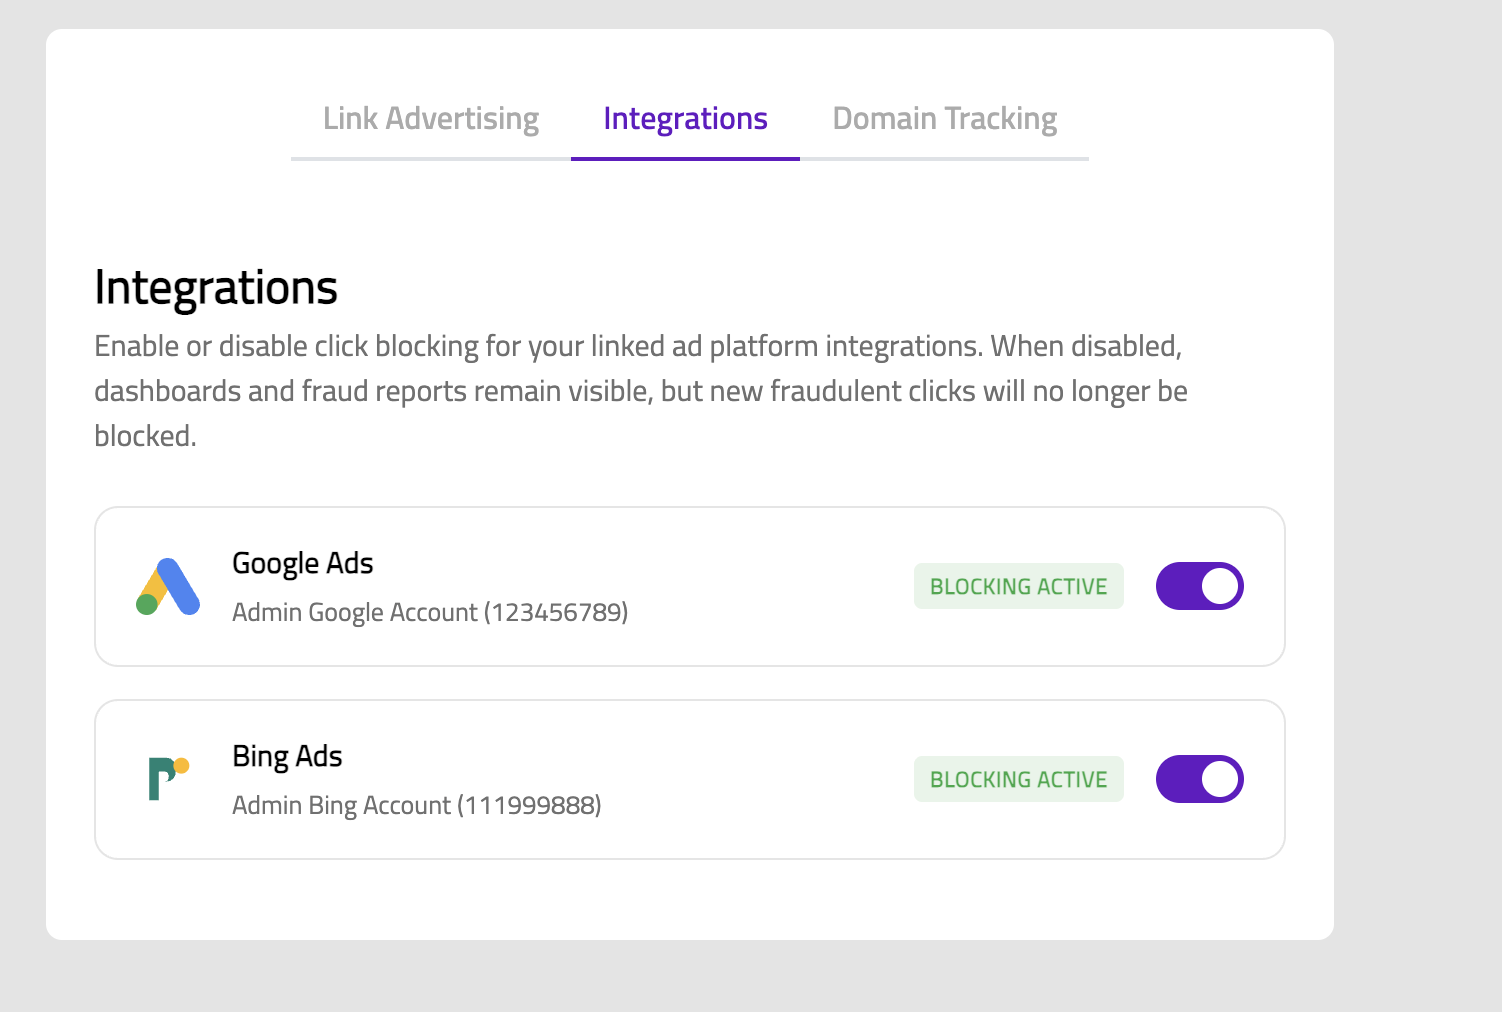
In Domain Settings > Integrations, enable blocking for each connected ad platform. When active, fraudulent IPs are automatically excluded from your campaigns.
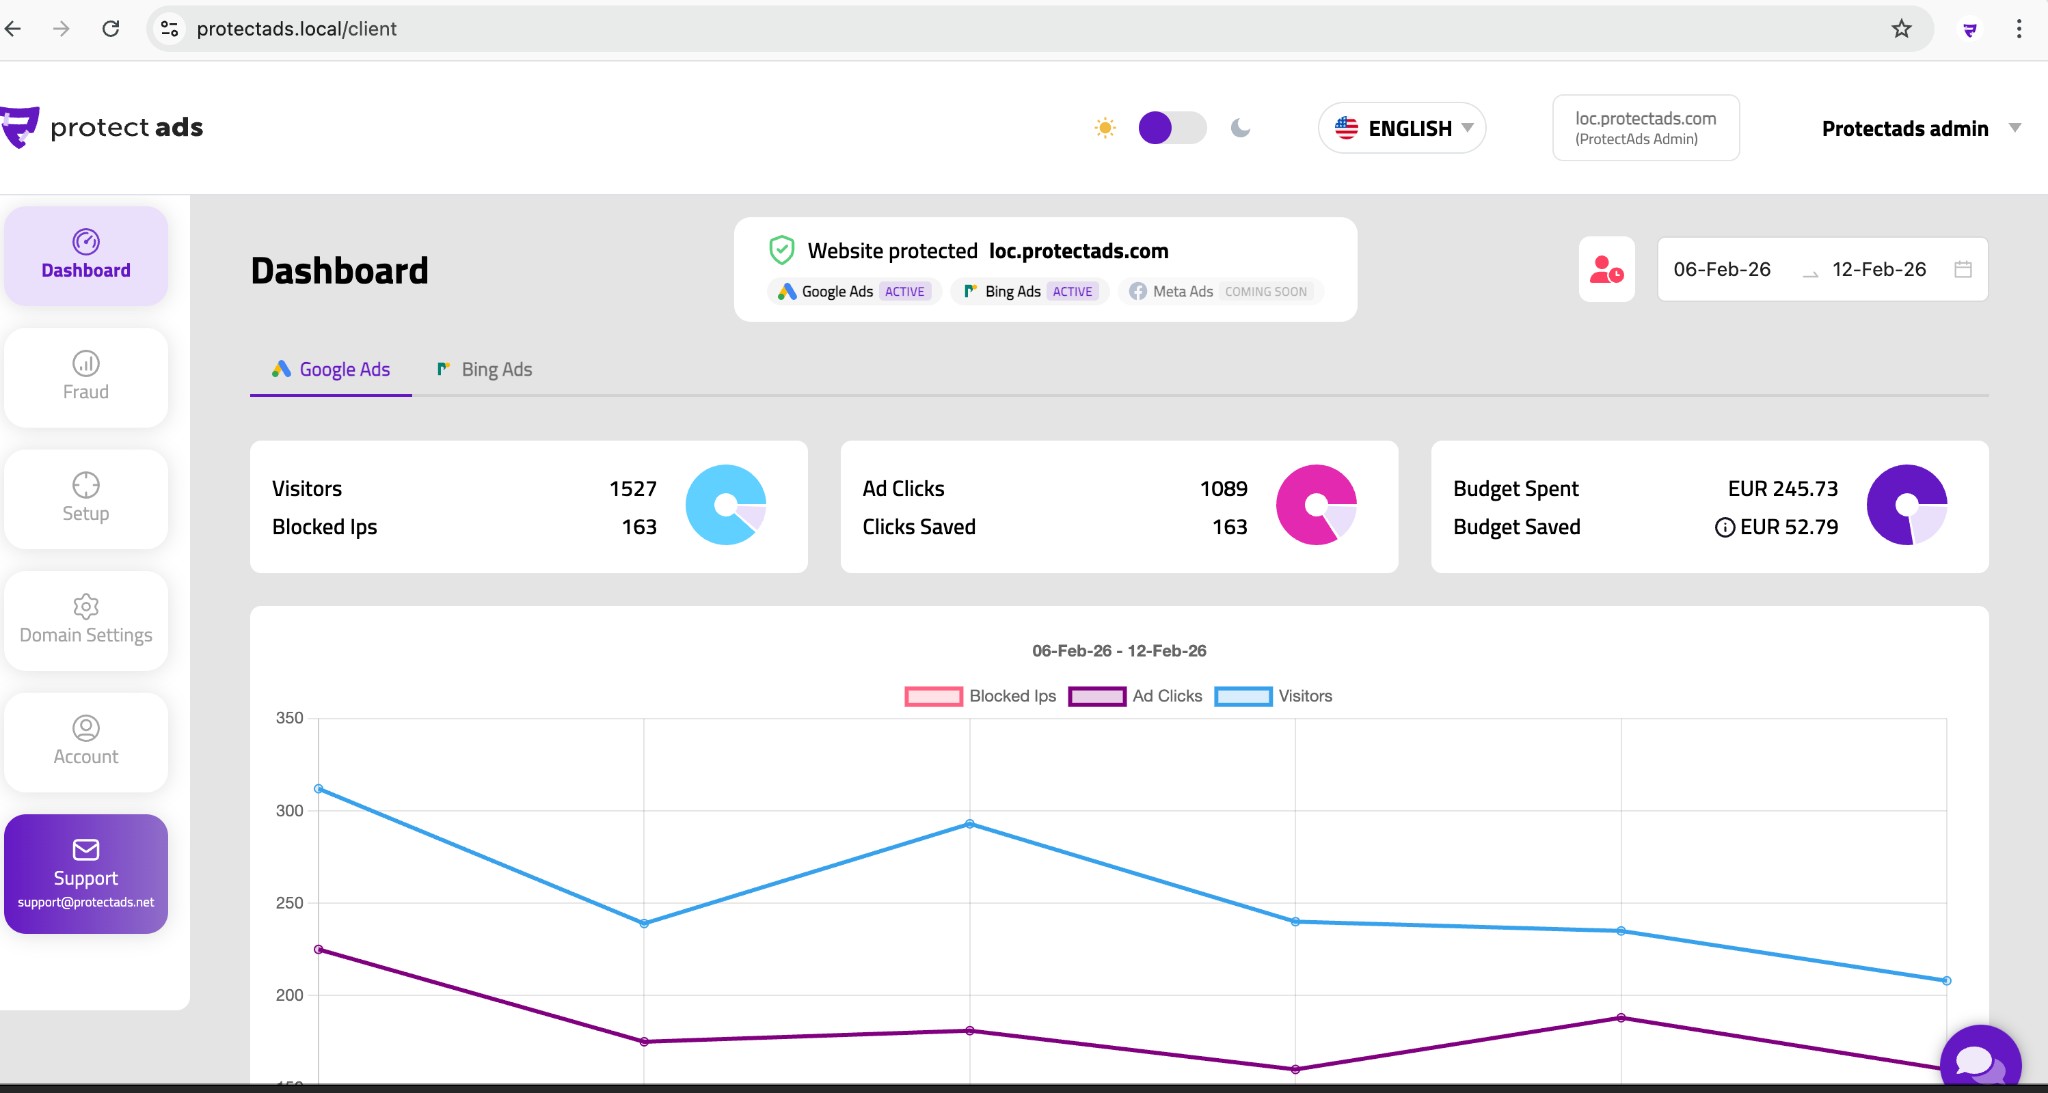
Your dashboard shows blocked IPs, ad clicks, visitors, and budget saved in real time. Use the date range picker and per-platform tabs to drill into the data.
Pick the method that matches your website. All options achieve the same result — getting the Protect Ads tracking code running on your pages.
The easiest way to add Protect Ads without touching your website code. Ideal for marketing teams and agencies.
Log in to your GTM account and open the container for your website. Click Tags > New, name it "Protect Ads Tracking", choose tag type Custom HTML, and paste the tracking code you copied from Domain Settings.
Under Triggering, select the built-in All Pages trigger. This ensures the Protect Ads script loads on every page view. For single-page applications (React, Vue, Angular), add a History Change trigger as well so the code fires on client-side navigation.
Click Preview to test the tag in GTM's debug mode. Visit your website and confirm the tag fires on page load. Once verified, click Submit > Publish. The Protect Ads script is now live on your site.
Pro tip: If you only want to track specific landing pages, replace the All Pages trigger with a Page View trigger filtered by URL path (e.g. /landing/*).
Add the tracking code to your WordPress site in under 2 minutes — no coding experience needed.
Install a free plugin like "WPCode — Insert Headers and Footers" or "Insert Headers and Footers by WPBeginner". Go to the plugin settings, paste the Protect Ads tracking code in the Body section, and save. The script will load site-wide on every page.
In your WordPress admin, go to Appearance > Theme File Editor and open header.php. Paste the tracking code right after the opening <body> tag. Note: theme updates may overwrite this, so a plugin or child theme is more reliable.
If you already use Google Tag Manager with a plugin like "GTM4WP", add the Protect Ads tag in GTM as described above. This centralizes all your tracking in one place.
Shopify makes it easy to add custom scripts across your store.
In your Shopify admin, go to Online Store > Themes > Edit code. Open the theme.liquid file and paste the Protect Ads tracking code right after the opening <body> tag. Click Save. The script will load on every page of your store.
If you're on Shopify Plus, go to Settings > Customer events and add a Custom Pixel. Paste the tracking code and activate it. This method is tag-manager-free and survives theme changes.
WooCommerce runs on WordPress, so all WordPress methods above apply. Additionally you can use WooCommerce-specific hooks.
The simplest approach is to follow the WordPress instructions above (plugin or theme edit). The Protect Ads script will automatically track all WooCommerce pages — product pages, cart, checkout, and thank-you pages.
Add the Protect Ads script to your Magento store via the admin panel or GTM.
Go to Content > Design > Configuration. Select your store view and expand the HTML Head section. Paste the Protect Ads tracking code in the "Scripts and Style Sheets" field. Save and flush the cache.
If you use Google Tag Manager with Magento (via an extension or built-in GTM support), add the Protect Ads tag in GTM following the GTM guide above.
Add custom tracking code to your Wix site in just a few clicks.
In your Wix dashboard, go to Settings > Custom Code (under Advanced). Click + Add Code, paste the Protect Ads tracking code, set it to load on All Pages in the Body - start section, and apply.
Squarespace supports custom code injection for all plans.
Go to Settings > Advanced > Code Injection. Paste the Protect Ads tracking code in the Footer field and save. The script will load on every page of your Squarespace site.
If your platform is not listed above, you can always add the script manually.
Open your website's main HTML template or layout file. Paste the Protect Ads tracking code right after the opening <body> tag (or before the closing </body> tag). Deploy the change and the script will run on every page.
As long as your website can load JavaScript, Protect Ads will work. This includes static sites, custom frameworks (Next.js, Nuxt, Gatsby, Laravel, Django, Rails), and any other platform.
Once the tracking code is live, fine-tune how Protect Ads detects and blocks fraud. All settings are available in the Setup section of your dashboard.
Set per-minute, per-day, and per-month click thresholds. Any IP that exceeds these limits is automatically blocked. You can also whitelist trusted IPs (your office, testing devices, partners) so they are never flagged.
Block traffic from VPNs, proxies, Tor browsers, high-threat sources, and suspicious subnets. Each layer can be toggled individually — enable everything for maximum protection, or dial back specific rules if needed.
Identify and block non-human traffic from crawlers, spiders, headless browsers (Puppeteer, Playwright, Selenium), and spoofed user agents. These layers catch sophisticated bots that mimic real browsers.
Detect suspicious patterns through click behavior — real-time rate detection, duplicate click suppression, competitor traffic monitoring, and cross-client abuse detection. Fine-grained controls let you balance protection vs. reach.
All 12 protection layers are pre-configured with sensible defaults. You can start blocking fraud immediately and adjust rules over time as you review dashboard data.
Once protection is active, the Fraud section gives you full visibility into every click, blocked IP, and campaign — across all connected ad platforms.
Generate official Click Quality reports (CSV) for Google Ads refund requests. The report tab shows blocked IPs in the selected period, fraud types breakdown, and a step-by-step guide for submitting your evidence to Google.
See every IP that has been blocked, along with its status (blocked/unblocked toggle), the reason it was flagged (Proxy, VPN, Crawler, Duplicate Click, etc.), country, and timestamp. You can search, filter, and export the data as CSV.
Browse all recorded ad clicks — including IP address, device type, ISP, referrer, country, and date. This raw data helps you spot patterns manually and cross-reference with your own analytics.
View fraud data per campaign — visitors, ad clicks, and blocked IPs for each campaign. Add campaigns from your Google or Bing Ads account and track which campaigns attract the most fraudulent traffic.
The PMax Protection tab shows your account-level exclusions for Performance Max campaigns. Enable or disable protection with a single toggle, and see how many IP slots are active out of the maximum allowed by Google (500).
Protect Ads also protects your Bing Ads (Microsoft Advertising) campaigns. Switch to the Bing Ads data source to see blocked IPs, fraud types, countries, and campaigns — with the same level of detail as Google Ads.
All fraud data is available for both Google Ads and Bing Ads. Use the data source tabs at the top of the Fraud page to switch between platforms.
If you run a digital agency and manage ads for multiple clients, Protect Ads lets you control everything from a single Clients Overview dashboard. The tracking script setup is the same for every website — add it once per domain and manage all configuration centrally.
The tracking code installation is identical for every domain — no agency-specific setup required.
Manage fraud limits, monthly click plans, and protection rules for all clients from one place.
Each client gets independent dashboard data, fraud reports, and campaign analytics — fully separated.
Use the domain selector to jump between client accounts without logging out or switching browsers.
Your agency hub. See all client domains at a glance — ad clicks, blocked IPs, budget spent, budget saved, and monthly plan. Switch between sub-companies instantly using the domain selector in the header.
Click "Add account" to onboard a new client. Fill in the industry, domain name, company details, phone, VAT ID, address, country, and city. Set the monthly click plan for this domain, then continue to the next step.
The setup process is the same for every website you manage. Copy the unique tracking code from Domain Settings and paste it on the client's site — via Google Tag Manager, WordPress plugin, Shopify theme, or any method described in the setup section above. One script per domain, installed once.
As long as your website can load JavaScript, Protect Ads will work. This includes static sites, custom frameworks (Next.js, Nuxt, Gatsby, Laravel, Django, Rails), and any other platform.
Open "Setup" for any client domain to fine-tune protection. Set Per Minute, Per Day, and Per Month click thresholds independently for each website. An IP that exceeds any of these limits is automatically blocked.
Click the monthly plan badge on any client row to adjust the number of monthly clicks allocated for that domain. This allows you to scale protection to match each client's ad budget and traffic volume.
Switch to any sub-company using the domain selector in the header. You get the full dashboard — visitors, blocked IPs, ad clicks, clicks saved, budget spent, and budget saved — with an interactive chart showing trends over your selected date range.
Each sub-company has its own Fraud tab with the full set of reports — Report for Google Ads, Blocked IPs, All Clicks, Countries, Campaigns, Clicks, and PMax Protection. The same level of detail and export capabilities available for standalone accounts.
Set Protect Ads up in minutes and see exactly how much fraudulent traffic is draining your campaigns.